
Learning Letters Worksheets: Complete Classroom Template
Learning Letters Worksheets: Complete Classroom Template

Article by
Milo
ESL Content Coordinator & Educator
ESL Content Coordinator & Educator
All Posts
Research published in Child Development shows that handwriting activates reading circuits better than tracing. Yet most basal programs squeeze letter work into ten-minute blocks. Half your class develops bad habits. These learning letters worksheets give you a systematic template. You build automatic recognition and proper motor patterns without killing your literacy block.
You get a complete daily structure. It works for morning work, centers, or small groups. I have used this with Pre-K students gripping crayons with whole fists. First graders use it to unlearn reverse letters. Setup takes twenty minutes. Differentiation is built in.
Still grading everything by hand?
EMStudio is a free teaching management app — manage your classes, students, lessons, and more!
Learn More

Still grading everything by hand?
EMStudio is a free teaching management app — manage your classes, students, lessons, and more!
Learn More
Table of Contents
What These Learning Letters Worksheets Cover
Weeks 1-6 hit the straight-line letters: E, F, H, I, L, T. These are your gateway letters. Kids master vertical and horizontal strokes before curves throw them off.
Weeks 7-12 introduce curved letters like C, O, Q, and S. By now their pencil control is solid. Weeks 13-18 tackle the diagonals: K, M, N, V, W, X, Y, Z. These demand more motor planning.
Weeks 19-26 mix review with digraph prep. This cements automaticity before blends arrive. No more letter-of-the-week chaos.
Straight-line letters have higher success rates for beginners. Curves require crossing the midline, which taxes developing motor skills. When 4-year-olds start with E and F before tackling S or C, they build confidence faster. Fewer tears during the first month.
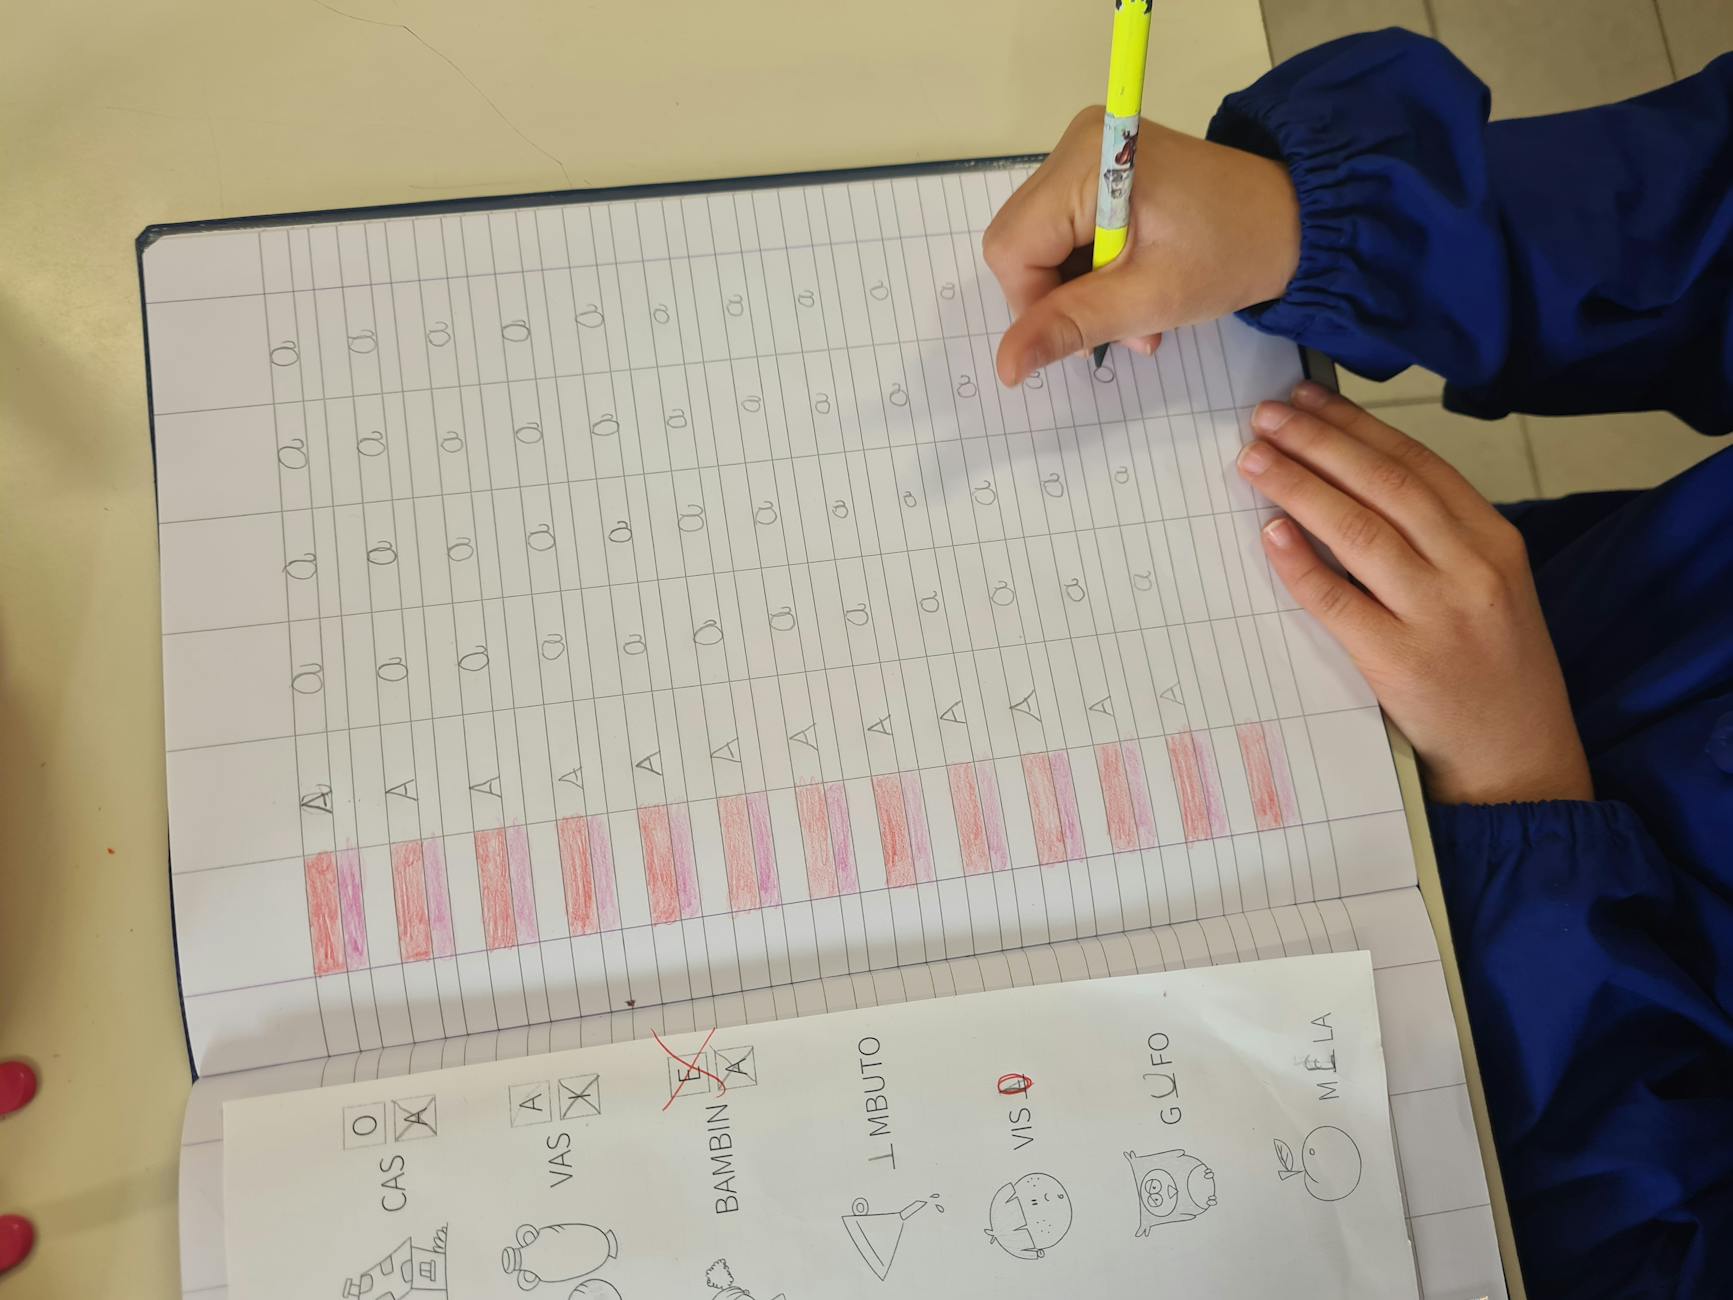
Each letter gets three distinct worksheet types that build like stairs. First comes Identification: students circle the target letter in a field of ten distractors. This is pure letter recognition.
Next is Formation: trace the letter with green start dots and red stop arrows. The visual cues prevent reversals. Green means go at the top; red means stop and lift. Students know exactly where to move their pencil.
Finally, Application: match the letter to pictures showing its initial sound. Think A for apple, not A for airplane. This links phonemic awareness to the symbol.
Line height matters more than most teachers realize. Here is the grade-by-grade breakdown:
Pre-K (ages 3-4): 2-inch ruled lines with dotted midlines at 50% height.
Kindergarten: 1-inch ruling with the same 50% midline placement.
First Grade: 0.5-inch lines maintaining that 50% midline proportion for handwriting practice.
The proportions support fine motor skills and proper letter formation without squishing descenders.
John Hattie's Visible Learning research puts explicit instruction at an effect size of 0.59, well above the hinge point of 0.40. These learning letters worksheets follow that evidence. Each page simultaneously presents the letter name, its primary sound, and the motor pattern. No isolation. No guessing.
This aligns with evidence-based literacy instruction. When you hit all three cues—visual, auditory, and kinesthetic—retention jumps. These learning the alphabet worksheets build early literacy through integrated practice.
The 26-week arc maps to a full school year of daily instruction. You move from isolated letters to digraph readiness by spring. I used this exact progression with my 2023 kindergarten class, and by February they were writing CVC words without prompts.
Complete Template Structure and Daily Components
I break my early literacy block into three distinct chunks. Each one targets a specific skill. This keeps my learning letters worksheets from turning into busywork. Kids know exactly what to expect when the bell rings.
Component | Time Allocation | Worksheet Type |
|---|---|---|
Morning Warm-Up | 5 min | ID drill |
Midday Workshop | 15 min | abc practice sheet |
Afternoon Application | 10 min | sound sort |
The Morning Warm-Up builds letter recognition fast. Five minutes of ID drills while backpacks are still being hung up. Students circle the target letter in a grid of random fonts. This visual discrimination matters more than you think.
The Midday Workshop is where handwriting practice happens. Fifteen minutes with an abc practice sheet gives time for proper letter formation. I walk the room checking pencil grips and starting points. Fine motor skills develop here, not during the rush of morning arrival.
Afternoon Application connects phonemic awareness to print. Ten minutes of sound sorts cements the letter-sound link. Kids cut and paste pictures under the correct column. This active work sticks better than tracing alone.
You can run this structure two ways. Letter of the Week gives you twenty minutes daily for kids who need deep intervention. You spend Monday introducing the shape, Tuesday through Thursday building fluency, Friday assessing. Letter of the Day moves in ten-minute bursts for advanced Kinders who entered reading ready.
Check your roster during week one. If sixty percent of your class recognizes fewer than ten letters, stick with the weekly pace. Otherwise, you'll lose the bottom third by Wednesday. I learned this the hard way with a class that seemed ready but wasn't.
Friday checks keep me honest. I use a three-point rubric for letter formation. Level one means they trace only with me prompting every stroke. Level two shows they copy using the visual guide on their desk. Level three is independent formation with correct stroke sequence top to bottom.
I don't move to the next letter set until eighty percent of the class hits level three. This benchmark protects your pacing. These ready-to-use worksheet templates include the rubric right on the Friday assessment page. I just highlight the level and move on.
Step-by-Step Setup Guide for First-Time Use
Print your scope sequence on 110lb white cardstock. Skip the 20lb copy paper from the teacher workroom—it shreds after three erasures when kids press hard practicing letter formation. I learned this after watching kids poke holes through thin paper with aggressive pencil grips. For 25 students completing a full 26-week set of learning letters worksheets, cardstock runs about $45 compared to $12 for regular paper. That $33 difference buys you five years of durability through hundreds of tracing attempts and wet-erase cycles. The heavier paper also absorbs less marker bleed, keeping pages readable month after month.
Store them in one-inch three-ring binders or C-Line reusable dry-erase pockets, item #40600. Place five pockets per center with four kids rotating through every fifteen minutes. Mark each pocket with washi tape: red for the high group, yellow for middle, green for emerging learners. This color system tracks who needs more phonemic awareness support versus who is ready for independent handwriting practice. It also tells students exactly where to return materials when the timer rings, eliminating the question "Where does this go?" during transitions.
Teach the "Start at the Star" motor plan before any child touches a pencil. Stick a half-inch green star sticker in the top-left corner of every page. Place a red dot sticker in the bottom-right. Train them to chant: "Green means go, red means stop, that's where my pencil will drop." This visual cue builds the left-to-right progression important for early literacy and letter recognition. It also reduces reversal errors that frustrate kids with developing fine motor skills who are still learning spatial orientation on the page.
Set up vertical file folders labeled A-Z inside a standard milk crate. The vertical orientation prevents bent corners that happen when papers stack flat in trays. Designate finished-work baskets by table color—blue, red, yellow, green. Every Friday, spend ten minutes filing completed learning to write worksheets. Hand two students "mail carrier" badges. They sort the papers into the alphabetized files while you reset the stations for Monday. This routine protects your structured lesson plan format from drowning in paperwork. It also turns cleanup into a sorting game that reinforces alphabet knowledge.
How Do You Differentiate These for Pre-K Through First Grade?
Differentiate by motor skill level and cognitive demand. Pre-K focuses on letter recognition with large motor movements using 2-inch lines for 10 minutes. Kindergarten adds phonemic awareness and tracing with 1-inch lines for 15 minutes. First grade integrates sight words and independent writing with 0.5-inch lines for 20 minutes.
Not every four-year-old is ready for pencil and paper. Match the tool to the hand, not the hand to the curriculum. These differentiated instruction strategies prevent tears and build confidence from day one.
Pre-K students work with 2-inch lines on learning letters worksheets designed for large movements. Snap crayons into one-inch stubs to force a proper tripod grip without lectures. Work for ten minutes only, focusing solely on letter naming. At this age, large motor movements build the foundation for later precision.
Kindergarteners need learning the alphabet worksheets that connect sounds to symbols explicitly. Use 1-inch lines and fifteen-minute sessions. When tracing the letter A, the child says "apple" or "ant" aloud. This links phonemic awareness to muscle memory and font recognition.
First graders use standard 0.5-inch lines for twenty-minute daily blocks. They write sight words like "the" and "and" from memory without tracing. The goal shifts from letter formation to automaticity in independent handwriting practice with proper spacing between words.
Check developmental checkpoints carefully before starting handwriting instruction. If a four-year-old cannot draw a vertical line top-to-bottom or close a circle by age four, delay the worksheets entirely. Implement Handwriting Without Tears "Mat Man" activities to build pre-writing skills first.
Fine motor control develops from the shoulder down, not the fingers up. Watch for wrist stability before introducing small tools like pencils.
Organize your letter recognition support into three distinct tiers. Tier one is the baseline worksheet for the whole group. Tier two provides highlighter tracing over gray letters for students needing visual tracking support. The yellow line guides the pencil without the cognitive load of creating the shape from scratch.
Tier three targets the fifteen to twenty percent of your class who need kinesthetic imprinting before paper work. These children trace sandpaper letters while vocalizing the sound, then attempt the worksheet. This sequence builds neurological pathways that pencil tracing alone cannot create. Most classrooms have three to four students who require this consistent sensory foundation to prevent bad habits.

Integrating ABC Practice Sheets With Multi-Sensory Activities
Every learning letters worksheets session needs a sensory anchor. After ten minutes of pencil work, I pull out 9x13 baking pans with a quarter-inch layer of salt. Kids trace the letter they just practiced, then shake the pan gently to erase and start over. The white salt against the dark pan bottom creates high contrast that helps visual memory.
Wikki Stix work better than clay for letter formation. Give each child six sticks to bend and connect into the letter shape they see on their abc practice sheet. The wax-coated yarn sticks to itself but not to desks, which means zero cleanup time. I store them in individual snack bags labeled with student names to prevent arguments.
Sandpaper rubbings add texture to handwriting practice. Cut 150-grit sandpaper into 4x6 inch rectangles. Students place paper over the top and crayon-rub to reveal the bumpy letter underneath. This builds fine motor skills while reinforcing letter recognition through touch. The resistance of the grit strengthens finger muscles needed for proper pencil control.
I follow the Trace-Say-Do protocol religiously. First, the child traces the worksheet while saying the letter name and sound aloud. Then they stand up and sky-write with full arm extension, chanting the sound again. Finally, they create the letter using one of the sensory tools. This sequence connects phonemic awareness with physical movement.
Research on multi-sensory instruction shows that triple-encoding—seeing, saying, and moving—improves retention for struggling learners. When a child processes the same letter through visual, auditory, and kinesthetic channels simultaneously, the neural pathways stick. This approach transforms early literacy from memorization into muscle memory that lasts.
Movement breaks prevent the wiggles from derailing focused work. Between worksheet sets, play LeapFrog Letter Factory songs or Have Fun Teaching alphabet videos. I run a strict timer: five minutes on the abc practice sheet, two minutes of dancing or singing, then five more minutes of focused work.
The 5-2-5 timing structure works because it matches the attention span of young learners. Four-year-olds cannot sustain handwriting practice for fifteen minutes straight, but they can focus intensely for five. The two-minute movement burst resets their posture and oxygenates the brain before the next round of letter formation work begins.
This rhythm keeps 4-to-6-year-olds engaged without burning them out. The active songs reinforce sound-symbol connections while giving their pencils a rest. You can find more tactile learning techniques to supplement these sessions.
Linking structured worksheets with sensory play creates a complete handwriting practice routine. The worksheet provides the visual model, while the salt trays and Wikki Stix cement the proper sequence of strokes. Add interactive letter recognition games to round out your week.

Avoiding Common Pitfalls With Learning to Write Worksheets
Watch out for the ball-and-stick trap. Some learning to write worksheets teach kids to draw F, T, and E as separate strokes—circle here, line there. That method doubles your reversal headaches. Continuous stroke work—like Handwriting Without Tears—keeps the pencil moving top-down without picking it up. Kids who learn continuous stroke show fewer b/d and p/q mix-ups, which is developmentally normal until age seven but still worth preventing.
Stop the worksheet immediately if you see these red flags. The child presses so hard the pencil tears through 110lb cardstock. Their wrist hooks inward at ninety degrees, which screams poor shoulder stability. They are under four and a half. Or an OT evaluation is pending for suspected dysgraphia. Do not push letter formation yet. Shift them to an easel or vertical whiteboard to build shoulder strength before returning to paper.
For b/d confusions, skip the "both letters on one page" approach until mastery is solid. I use the bed visual anchor—the word bed actually looks like a bed with the posts. On learning letters worksheets, shade the target letter at eighty percent gray and the distractor at twenty percent. This applies errorless learning implementation principles so the correct choice pops while the wrong one fades, building letter recognition without frustration.
Digital pronate grips or thumb wraps signal that fine motor skills are not ready for early literacy tasks yet. That fist grip will engrain bad motor patterns you will spend months undoing. Pull back. Hand the child broken crayon pieces—one-inch stubs force a pinch grip naturally. Practice the Pinch and Flip technique daily for two weeks. Then reintroduce handwriting practice once the thumb and fingers can oppose correctly.
Your 5-Day Implementation Plan for Reading for Beginners Worksheets
Start Monday with Alphabet Mystery by Audrey Wood. The missing-letter plot grabs 5-year-olds immediately. While you read aloud, pull out Hideaway Bay magnetic letters and stick the target letter front-and-center on your whiteboard. Then distribute the learning letters worksheets. Keep Monday purely visual—just letter recognition. Students circle every instance of the target letter hidden randomly among ten distractors. No writing required yet. Twenty minutes, done.
Tuesday bridges gross motor to fine motor. Students air-write with arms extended at shoulder height—sky writing that engages shoulder muscles. Then they sit for rainbow writing.
They trace the same two-inch letter five times using different crayon colors. I make them switch colors for every stroke. Insist on top-to-bottom sequence. This builds muscle memory for handwriting practice later.
Wednesday isolates initial sounds to build phonemic awareness. Fill a paper bag with objects starting with your target phoneme—think apple, alligator, and plastic ax for the short /a/ sound. Let students pull items out and name them slowly, stretching that first sound.
The reading for beginners worksheets today display six pictures arranged around the target letter. Kids draw lines connecting the letter to the four correct matches. Include two distractors starting with different phonemes. This separates true listening from simple picture matching.
Thursday focuses on letter construction before writing. Give small groups magnetic letter builders on cookie sheets. They physically assemble the letter using straight and curved magnetic pieces. Then they attack the cut-and-paste worksheet sorting curved versus straight letters. This integrates fine motor skills with early literacy. The physical sorting helps them internalize the letter's anatomy.
Friday combines assessment and creativity. Begin with the independent letter formation check. Each student writes the uppercase and lowercase version three times without a model visible on their desk. You watch for correct stroke sequence and pencil grip.
Then unleash the craft—A becomes an alligator mouth with sharp teeth cut from paper triangles. Slip both the assessment and the artwork into a hanging file for portfolios. This five-day sequence builds foundational reading skills without exhausting you or the kids.

What This Means for Your Classroom
You now have a system that connects letter formation to actual reading, not just isolated tracing. These learning letters worksheets aren't busywork. Pair the handwriting practice with sand trays and sound mapping. You hit fine motor skills and phonemic awareness together. That's three standards covered in ten focused minutes.
Stop searching for the perfect printable on Sunday night. You already built the structure. On Monday, pull the template, set your highlighters for differentiation groups, and run the routine. Watch which kids grip their pencils wrong during the first stroke. Fix it immediately before bad habits set in stone.
Reading for beginners only sticks when the letters feel familiar in their hands and mouths. Consistent, daily practice beats the colorful worksheet hoarded in a filing cabinet. Use this five-day plan starting tomorrow. Track who moves from sand to pencil smoothly. Then tell me which letter your strugglers mastered first.
What These Learning Letters Worksheets Cover
Weeks 1-6 hit the straight-line letters: E, F, H, I, L, T. These are your gateway letters. Kids master vertical and horizontal strokes before curves throw them off.
Weeks 7-12 introduce curved letters like C, O, Q, and S. By now their pencil control is solid. Weeks 13-18 tackle the diagonals: K, M, N, V, W, X, Y, Z. These demand more motor planning.
Weeks 19-26 mix review with digraph prep. This cements automaticity before blends arrive. No more letter-of-the-week chaos.
Straight-line letters have higher success rates for beginners. Curves require crossing the midline, which taxes developing motor skills. When 4-year-olds start with E and F before tackling S or C, they build confidence faster. Fewer tears during the first month.
Each letter gets three distinct worksheet types that build like stairs. First comes Identification: students circle the target letter in a field of ten distractors. This is pure letter recognition.
Next is Formation: trace the letter with green start dots and red stop arrows. The visual cues prevent reversals. Green means go at the top; red means stop and lift. Students know exactly where to move their pencil.
Finally, Application: match the letter to pictures showing its initial sound. Think A for apple, not A for airplane. This links phonemic awareness to the symbol.
Line height matters more than most teachers realize. Here is the grade-by-grade breakdown:
Pre-K (ages 3-4): 2-inch ruled lines with dotted midlines at 50% height.
Kindergarten: 1-inch ruling with the same 50% midline placement.
First Grade: 0.5-inch lines maintaining that 50% midline proportion for handwriting practice.
The proportions support fine motor skills and proper letter formation without squishing descenders.
John Hattie's Visible Learning research puts explicit instruction at an effect size of 0.59, well above the hinge point of 0.40. These learning letters worksheets follow that evidence. Each page simultaneously presents the letter name, its primary sound, and the motor pattern. No isolation. No guessing.
This aligns with evidence-based literacy instruction. When you hit all three cues—visual, auditory, and kinesthetic—retention jumps. These learning the alphabet worksheets build early literacy through integrated practice.
The 26-week arc maps to a full school year of daily instruction. You move from isolated letters to digraph readiness by spring. I used this exact progression with my 2023 kindergarten class, and by February they were writing CVC words without prompts.
Complete Template Structure and Daily Components
I break my early literacy block into three distinct chunks. Each one targets a specific skill. This keeps my learning letters worksheets from turning into busywork. Kids know exactly what to expect when the bell rings.
Component | Time Allocation | Worksheet Type |
|---|---|---|
Morning Warm-Up | 5 min | ID drill |
Midday Workshop | 15 min | abc practice sheet |
Afternoon Application | 10 min | sound sort |
The Morning Warm-Up builds letter recognition fast. Five minutes of ID drills while backpacks are still being hung up. Students circle the target letter in a grid of random fonts. This visual discrimination matters more than you think.
The Midday Workshop is where handwriting practice happens. Fifteen minutes with an abc practice sheet gives time for proper letter formation. I walk the room checking pencil grips and starting points. Fine motor skills develop here, not during the rush of morning arrival.
Afternoon Application connects phonemic awareness to print. Ten minutes of sound sorts cements the letter-sound link. Kids cut and paste pictures under the correct column. This active work sticks better than tracing alone.
You can run this structure two ways. Letter of the Week gives you twenty minutes daily for kids who need deep intervention. You spend Monday introducing the shape, Tuesday through Thursday building fluency, Friday assessing. Letter of the Day moves in ten-minute bursts for advanced Kinders who entered reading ready.
Check your roster during week one. If sixty percent of your class recognizes fewer than ten letters, stick with the weekly pace. Otherwise, you'll lose the bottom third by Wednesday. I learned this the hard way with a class that seemed ready but wasn't.
Friday checks keep me honest. I use a three-point rubric for letter formation. Level one means they trace only with me prompting every stroke. Level two shows they copy using the visual guide on their desk. Level three is independent formation with correct stroke sequence top to bottom.
I don't move to the next letter set until eighty percent of the class hits level three. This benchmark protects your pacing. These ready-to-use worksheet templates include the rubric right on the Friday assessment page. I just highlight the level and move on.
Step-by-Step Setup Guide for First-Time Use
Print your scope sequence on 110lb white cardstock. Skip the 20lb copy paper from the teacher workroom—it shreds after three erasures when kids press hard practicing letter formation. I learned this after watching kids poke holes through thin paper with aggressive pencil grips. For 25 students completing a full 26-week set of learning letters worksheets, cardstock runs about $45 compared to $12 for regular paper. That $33 difference buys you five years of durability through hundreds of tracing attempts and wet-erase cycles. The heavier paper also absorbs less marker bleed, keeping pages readable month after month.
Store them in one-inch three-ring binders or C-Line reusable dry-erase pockets, item #40600. Place five pockets per center with four kids rotating through every fifteen minutes. Mark each pocket with washi tape: red for the high group, yellow for middle, green for emerging learners. This color system tracks who needs more phonemic awareness support versus who is ready for independent handwriting practice. It also tells students exactly where to return materials when the timer rings, eliminating the question "Where does this go?" during transitions.
Teach the "Start at the Star" motor plan before any child touches a pencil. Stick a half-inch green star sticker in the top-left corner of every page. Place a red dot sticker in the bottom-right. Train them to chant: "Green means go, red means stop, that's where my pencil will drop." This visual cue builds the left-to-right progression important for early literacy and letter recognition. It also reduces reversal errors that frustrate kids with developing fine motor skills who are still learning spatial orientation on the page.
Set up vertical file folders labeled A-Z inside a standard milk crate. The vertical orientation prevents bent corners that happen when papers stack flat in trays. Designate finished-work baskets by table color—blue, red, yellow, green. Every Friday, spend ten minutes filing completed learning to write worksheets. Hand two students "mail carrier" badges. They sort the papers into the alphabetized files while you reset the stations for Monday. This routine protects your structured lesson plan format from drowning in paperwork. It also turns cleanup into a sorting game that reinforces alphabet knowledge.
How Do You Differentiate These for Pre-K Through First Grade?
Differentiate by motor skill level and cognitive demand. Pre-K focuses on letter recognition with large motor movements using 2-inch lines for 10 minutes. Kindergarten adds phonemic awareness and tracing with 1-inch lines for 15 minutes. First grade integrates sight words and independent writing with 0.5-inch lines for 20 minutes.
Not every four-year-old is ready for pencil and paper. Match the tool to the hand, not the hand to the curriculum. These differentiated instruction strategies prevent tears and build confidence from day one.
Pre-K students work with 2-inch lines on learning letters worksheets designed for large movements. Snap crayons into one-inch stubs to force a proper tripod grip without lectures. Work for ten minutes only, focusing solely on letter naming. At this age, large motor movements build the foundation for later precision.
Kindergarteners need learning the alphabet worksheets that connect sounds to symbols explicitly. Use 1-inch lines and fifteen-minute sessions. When tracing the letter A, the child says "apple" or "ant" aloud. This links phonemic awareness to muscle memory and font recognition.
First graders use standard 0.5-inch lines for twenty-minute daily blocks. They write sight words like "the" and "and" from memory without tracing. The goal shifts from letter formation to automaticity in independent handwriting practice with proper spacing between words.
Check developmental checkpoints carefully before starting handwriting instruction. If a four-year-old cannot draw a vertical line top-to-bottom or close a circle by age four, delay the worksheets entirely. Implement Handwriting Without Tears "Mat Man" activities to build pre-writing skills first.
Fine motor control develops from the shoulder down, not the fingers up. Watch for wrist stability before introducing small tools like pencils.
Organize your letter recognition support into three distinct tiers. Tier one is the baseline worksheet for the whole group. Tier two provides highlighter tracing over gray letters for students needing visual tracking support. The yellow line guides the pencil without the cognitive load of creating the shape from scratch.
Tier three targets the fifteen to twenty percent of your class who need kinesthetic imprinting before paper work. These children trace sandpaper letters while vocalizing the sound, then attempt the worksheet. This sequence builds neurological pathways that pencil tracing alone cannot create. Most classrooms have three to four students who require this consistent sensory foundation to prevent bad habits.
Integrating ABC Practice Sheets With Multi-Sensory Activities
Every learning letters worksheets session needs a sensory anchor. After ten minutes of pencil work, I pull out 9x13 baking pans with a quarter-inch layer of salt. Kids trace the letter they just practiced, then shake the pan gently to erase and start over. The white salt against the dark pan bottom creates high contrast that helps visual memory.
Wikki Stix work better than clay for letter formation. Give each child six sticks to bend and connect into the letter shape they see on their abc practice sheet. The wax-coated yarn sticks to itself but not to desks, which means zero cleanup time. I store them in individual snack bags labeled with student names to prevent arguments.
Sandpaper rubbings add texture to handwriting practice. Cut 150-grit sandpaper into 4x6 inch rectangles. Students place paper over the top and crayon-rub to reveal the bumpy letter underneath. This builds fine motor skills while reinforcing letter recognition through touch. The resistance of the grit strengthens finger muscles needed for proper pencil control.
I follow the Trace-Say-Do protocol religiously. First, the child traces the worksheet while saying the letter name and sound aloud. Then they stand up and sky-write with full arm extension, chanting the sound again. Finally, they create the letter using one of the sensory tools. This sequence connects phonemic awareness with physical movement.
Research on multi-sensory instruction shows that triple-encoding—seeing, saying, and moving—improves retention for struggling learners. When a child processes the same letter through visual, auditory, and kinesthetic channels simultaneously, the neural pathways stick. This approach transforms early literacy from memorization into muscle memory that lasts.
Movement breaks prevent the wiggles from derailing focused work. Between worksheet sets, play LeapFrog Letter Factory songs or Have Fun Teaching alphabet videos. I run a strict timer: five minutes on the abc practice sheet, two minutes of dancing or singing, then five more minutes of focused work.
The 5-2-5 timing structure works because it matches the attention span of young learners. Four-year-olds cannot sustain handwriting practice for fifteen minutes straight, but they can focus intensely for five. The two-minute movement burst resets their posture and oxygenates the brain before the next round of letter formation work begins.
This rhythm keeps 4-to-6-year-olds engaged without burning them out. The active songs reinforce sound-symbol connections while giving their pencils a rest. You can find more tactile learning techniques to supplement these sessions.
Linking structured worksheets with sensory play creates a complete handwriting practice routine. The worksheet provides the visual model, while the salt trays and Wikki Stix cement the proper sequence of strokes. Add interactive letter recognition games to round out your week.
Avoiding Common Pitfalls With Learning to Write Worksheets
Watch out for the ball-and-stick trap. Some learning to write worksheets teach kids to draw F, T, and E as separate strokes—circle here, line there. That method doubles your reversal headaches. Continuous stroke work—like Handwriting Without Tears—keeps the pencil moving top-down without picking it up. Kids who learn continuous stroke show fewer b/d and p/q mix-ups, which is developmentally normal until age seven but still worth preventing.
Stop the worksheet immediately if you see these red flags. The child presses so hard the pencil tears through 110lb cardstock. Their wrist hooks inward at ninety degrees, which screams poor shoulder stability. They are under four and a half. Or an OT evaluation is pending for suspected dysgraphia. Do not push letter formation yet. Shift them to an easel or vertical whiteboard to build shoulder strength before returning to paper.
For b/d confusions, skip the "both letters on one page" approach until mastery is solid. I use the bed visual anchor—the word bed actually looks like a bed with the posts. On learning letters worksheets, shade the target letter at eighty percent gray and the distractor at twenty percent. This applies errorless learning implementation principles so the correct choice pops while the wrong one fades, building letter recognition without frustration.
Digital pronate grips or thumb wraps signal that fine motor skills are not ready for early literacy tasks yet. That fist grip will engrain bad motor patterns you will spend months undoing. Pull back. Hand the child broken crayon pieces—one-inch stubs force a pinch grip naturally. Practice the Pinch and Flip technique daily for two weeks. Then reintroduce handwriting practice once the thumb and fingers can oppose correctly.
Your 5-Day Implementation Plan for Reading for Beginners Worksheets
Start Monday with Alphabet Mystery by Audrey Wood. The missing-letter plot grabs 5-year-olds immediately. While you read aloud, pull out Hideaway Bay magnetic letters and stick the target letter front-and-center on your whiteboard. Then distribute the learning letters worksheets. Keep Monday purely visual—just letter recognition. Students circle every instance of the target letter hidden randomly among ten distractors. No writing required yet. Twenty minutes, done.
Tuesday bridges gross motor to fine motor. Students air-write with arms extended at shoulder height—sky writing that engages shoulder muscles. Then they sit for rainbow writing.
They trace the same two-inch letter five times using different crayon colors. I make them switch colors for every stroke. Insist on top-to-bottom sequence. This builds muscle memory for handwriting practice later.
Wednesday isolates initial sounds to build phonemic awareness. Fill a paper bag with objects starting with your target phoneme—think apple, alligator, and plastic ax for the short /a/ sound. Let students pull items out and name them slowly, stretching that first sound.
The reading for beginners worksheets today display six pictures arranged around the target letter. Kids draw lines connecting the letter to the four correct matches. Include two distractors starting with different phonemes. This separates true listening from simple picture matching.
Thursday focuses on letter construction before writing. Give small groups magnetic letter builders on cookie sheets. They physically assemble the letter using straight and curved magnetic pieces. Then they attack the cut-and-paste worksheet sorting curved versus straight letters. This integrates fine motor skills with early literacy. The physical sorting helps them internalize the letter's anatomy.
Friday combines assessment and creativity. Begin with the independent letter formation check. Each student writes the uppercase and lowercase version three times without a model visible on their desk. You watch for correct stroke sequence and pencil grip.
Then unleash the craft—A becomes an alligator mouth with sharp teeth cut from paper triangles. Slip both the assessment and the artwork into a hanging file for portfolios. This five-day sequence builds foundational reading skills without exhausting you or the kids.
What This Means for Your Classroom
You now have a system that connects letter formation to actual reading, not just isolated tracing. These learning letters worksheets aren't busywork. Pair the handwriting practice with sand trays and sound mapping. You hit fine motor skills and phonemic awareness together. That's three standards covered in ten focused minutes.
Stop searching for the perfect printable on Sunday night. You already built the structure. On Monday, pull the template, set your highlighters for differentiation groups, and run the routine. Watch which kids grip their pencils wrong during the first stroke. Fix it immediately before bad habits set in stone.
Reading for beginners only sticks when the letters feel familiar in their hands and mouths. Consistent, daily practice beats the colorful worksheet hoarded in a filing cabinet. Use this five-day plan starting tomorrow. Track who moves from sand to pencil smoothly. Then tell me which letter your strugglers mastered first.
Still grading everything by hand?
EMStudio is a free teaching management app — manage your classes, students, lessons, and more!
Learn More
Still grading everything by hand?
EMStudio is a free teaching management app — manage your classes, students, lessons, and more!
Learn More


Notion4Teachers
Notion templates to simplify administrative tasks and enhance your teaching experience.


2026 Notion4Teachers. All Rights Reserved.
Notion4Teachers
Notion templates to simplify administrative tasks and enhance your teaching experience.
2026 Notion4Teachers. All Rights Reserved.
Notion4Teachers
Notion templates to simplify administrative tasks and enhance your teaching experience.
2026 Notion4Teachers. All Rights Reserved.