How to Run a Schoolyard Tree Inventory With Your Class

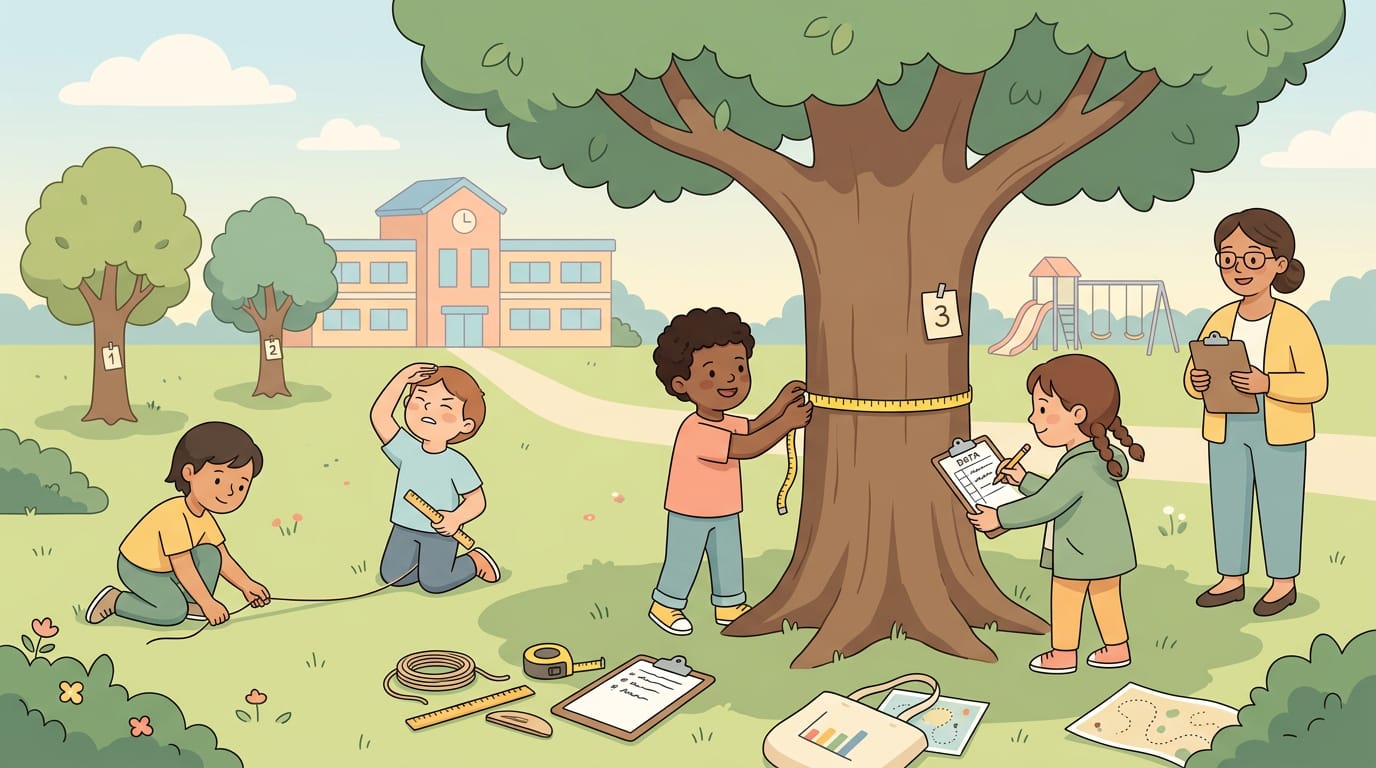
A schoolyard tree inventory is one of the easiest hands-on projects you can run with the trees you already have. Students measure a trunk, estimate a height, identify the species, and record what they find. That covers measurement, math, life science, and data in one unit, and all it takes is a tape measure, some string, a ruler, and a clipboard.
Here's the short version. Pick a small group of trees, give each one a number, have students work in pairs to measure and identify them, and put everything on one shared data sheet. The one thing to keep clear from day one: students are collecting information, not deciding whether a tree is safe. That's a job for a professional.
Still grading everything by hand?
EMStudio is a free teaching management app — manage your classes, students, lessons, and more!
Why run a tree inventory with students?
It turns skills students are already learning into something they can see and touch. Circumference and diameter stop being numbers on a worksheet when you're wrapping a tape around an actual oak.
A good inventory gives you:
Math in context. Circumference, diameter, ratios, averages, and graphs.
Real science. Species, habitat, growth, and the difference between a young tree and an old one.
Data habits. Students learn to measure more than once, write things down the same way every time, and check each other's work.
A record the school can use. Grounds staff rarely have a map of what's planted where, and a class can make one.
Project Learning Tree's How Big Is Your Tree? activity works this way. Students estimate a tree's height and diameter, and use a bit of string and a simple calculation to answer the question, "What can tree measurements tell us?"
What can a class inventory tell you, and what can't it?
It can tell you how many trees you have, what kinds, how big they are, and where. It can't tell you whether any of them are safe, and that's an important line to teach alongside the measuring.
Scott Seargeant, an ISA Certified Arborist and founder of Seargeant Landscape & Arboriculture, a consulting arborist, tree assessment, and forensic tree analysis company in Visalia, California, says that's the part schools most need to hear.
A class inventory is a great thing for a school to have. Kids learn to measure, and the grounds crew finally gets a map of what's out there. But keep one line clear: measuring a tree is not the same as judging whether it's safe. Students can note a dead limb or a mushroom at the base, and that's useful, but how serious it is belongs to a certified arborist. Flag it, take a photo, keep everyone away from underneath it, and pass it up the chain. That's the right job for a student.
What do you need?
Nothing fancy:
A flexible tape measure, or string and a ruler, for each pair
A calculator
A field guide or other species reference for your area
A clipboard and a printed data sheet per pair
A camera or tablet for photos, if you have one
A simple site map, even a hand-drawn one, so every tree has a number and a location
Choose your trees first. Ten to fifteen is plenty for a class, and it keeps the project finishable in a week or two.
What should students record?
Use one data sheet for everyone, so the numbers can be compared. Each row is one tree. A paper table works, and so does any shared spreadsheet. These columns cover it:
Tree number. Matches the number on your site map.
Species. Common name, plus a note if the pair isn't sure.
Location. A short description or a spot on the map.
Circumference. In inches or centimeters, taken at breast height.
Diameter. Calculated from the circumference.
Height. Estimated.
Date and who measured it.
Notes. Anything unusual, in plain words.
Photo. One of the whole tree, one of the bark, one of a leaf.
Add a separate column for "ask an adult." Students use it for anything that looks off, like dead branches, cracks, or fungus. They don't have to know what it means. They only have to flag it.
How do students measure a tree?
There are two measurements, and both are simple.
Diameter at breast height. Foresters measure trunk size at a standard height of 4.5 feet (about 1.4 meters) above the ground, called diameter at breast height, or DBH. Here's how students do it:
Find 4.5 feet on the trunk. A stick or string cut to that length, or a mark on a student's body, makes a handy reference.
Wrap the tape around the trunk at that height. Keep it flat, level, and untwisted.
Read the circumference, then divide it by 3.14 to get the diameter.
Repeat at least three times and average the results, and have the recorder read each number back to the measurer.
The Wisconsin DNR's tree math handout gives the same formula: circumference divided by 3.14 equals diameter, and a Harvard Arboretum teacher guide uses the three-trial average. On a tree with a lean or a bulge at 4.5 feet, measure just above or below the swelling and note it.
Height. Without special equipment, use the ruler method:
One student stands at the base of the tree.
Another walks away and holds a ruler at arm's length until the top and bottom of the ruler line up with the top and bottom of the tree.
Read how tall the standing student looks on the ruler.
Divide the length of the ruler by that apparent height, then multiply by the student's real height.
For example, a 30 cm ruler where a 140 cm student appears 5 cm tall gives 30 ÷ 5 = 6, and 6 × 140 = 840 cm, or 8.4 meters. It's an estimate, which is a good lesson on its own: ask students why two pairs might get slightly different answers for the same tree.
How do students identify the species?
Keep it simple. Students look at the leaf shape and arrangement, the bark, the overall shape of the tree, and any seeds, nuts, or flowers, and then match what they see to a field guide.
A few tips make this easier:
Photograph the leaf and bark before you start flipping pages.
Allow "not sure" as an answer. A good guess recorded honestly beats a confident wrong one.
Check uncertain trees as a class, or ask a local extension office, nature center, or parks department to help.
Pick up fallen leaves from the ground instead of pulling them off the tree.
What should students leave to the grown-ups?
Set a few ground rules before you step outside:
No climbing. Not on the trees, and not on low branches either.
Stay out from under dead or hanging limbs. If a branch looks wrong, measure from a distance or skip that tree.
Don't nail, staple, or wire anything to a tree. It wounds the bark. Number your map instead, or use a loose marker.
Skip windy or stormy days.
Report, don't judge. Anything concerning goes in the "ask an adult" column, and the adult passes it to whoever manages the grounds.
What do you do with the data?
This is where the project pays off. A few ideas:
Graph it. A bar chart of species counts, a plot of diameter against height, or the average diameter of each species.
Look for patterns. Which trees are the biggest? Do tall trees always have thick trunks? What does a thin trunk with a large height tell you?
Re-measure. Take the same measurements once a year at the same time of year and compare. Students can see growth for themselves.
Share it. Give the finished map and data sheet to your facilities team or principal. They'll appreciate it, and it makes it easier to say "this tree needs a look."
Estimating a tree's age is trickier. Scientists count growth rings from a core taken with a special tool, which isn't something for a classroom, so treat age as a discussion topic rather than a measurement.
When should the school call an arborist?
When a student or staff member flags something in the "ask an adult" column, and always for trees over walkways, play areas, parking, or buildings. A certified arborist can judge how serious a defect is, which students and most teachers can't.
When you call, ask:
Are you an ISA Certified Arborist, and can I verify it?
Will you give us a written report?
Do you also sell tree removal, or is your advice independent of any work you'd be paid for?
What options besides removal will you consider?
How often should the tree be looked at again?
One more quick check before you hire: search the arborist's name. Editorial HQ, a link building agency, suggests looking for independent mentions, like local news, industry groups, or community projects, because a professional with an outside track record is easier to trust than one who only has a polished website.
Keep the report with your inventory. Together, they make a useful long-term record for the school.
Frequently asked questions
What grade level is this for?
Middle school is the sweet spot, and Project Learning Tree tags its version of the activity for grades 6 to 8. Older students can add more math and more precise instruments, and younger ones can work with string and a ruler in a simplified version, with more help.
Do we need permission to measure trees on school grounds?
Check with your principal or facilities team first. Most schools welcome it, and it keeps the grounds staff in the loop.
Can students tell if a tree is dangerous?
No. They can notice and report things, like dead limbs, cracks, or mushrooms at the base, but judging how serious they are takes professional training.
How many trees should we measure?
Ten to fifteen is enough for one class and keeps the project to a week or two. You can add more each year and build the inventory over time.
Final Thoughts
A tree inventory takes a few tape measures and some string, and it gives students a real reason to use math and science outdoors. It also gives the school something it probably doesn't have: a clear record of its trees.
Teach the measuring, teach the observing, and teach the difference between reporting a concern and diagnosing it. That's the whole project, and it's a good lesson in knowing what you know and who to ask for the rest.
Still grading everything by hand?
EMStudio is a free teaching management app — manage your classes, students, lessons, and more!